Contributing
You can contribute to the Research Support Handbook by making small edits, writing entirely new topics, or writing guides. All contributions are welcome and appreciated, small and large. If you are in need of specific information, you can skip ahead using the table of contents.
Contributing portal
We offer a portal to reduce the barriers to contribute to the Research Support Handbook. You only need an internet connection and articulate what you want us to include. No accounts necessary 😊
Open the contribution portal by clicking here or copy-pasting: https://ez-github-contributor.netlify.app/
You can report issues you find with the Research Support Handbook using the “Report a problem” tab. This is a way for you to share your feedback with us.
You can propose new topics or guides to the Research Support Handbook using the “Propose new page” tab. This will be considered for inclusion. Please mention whether it should be a topic or a guide. The text editor allows you to use rich text formatting.
The portal does not save your work. Use the portal when you are ready to submit your work, but do not use it to manage your submissions.
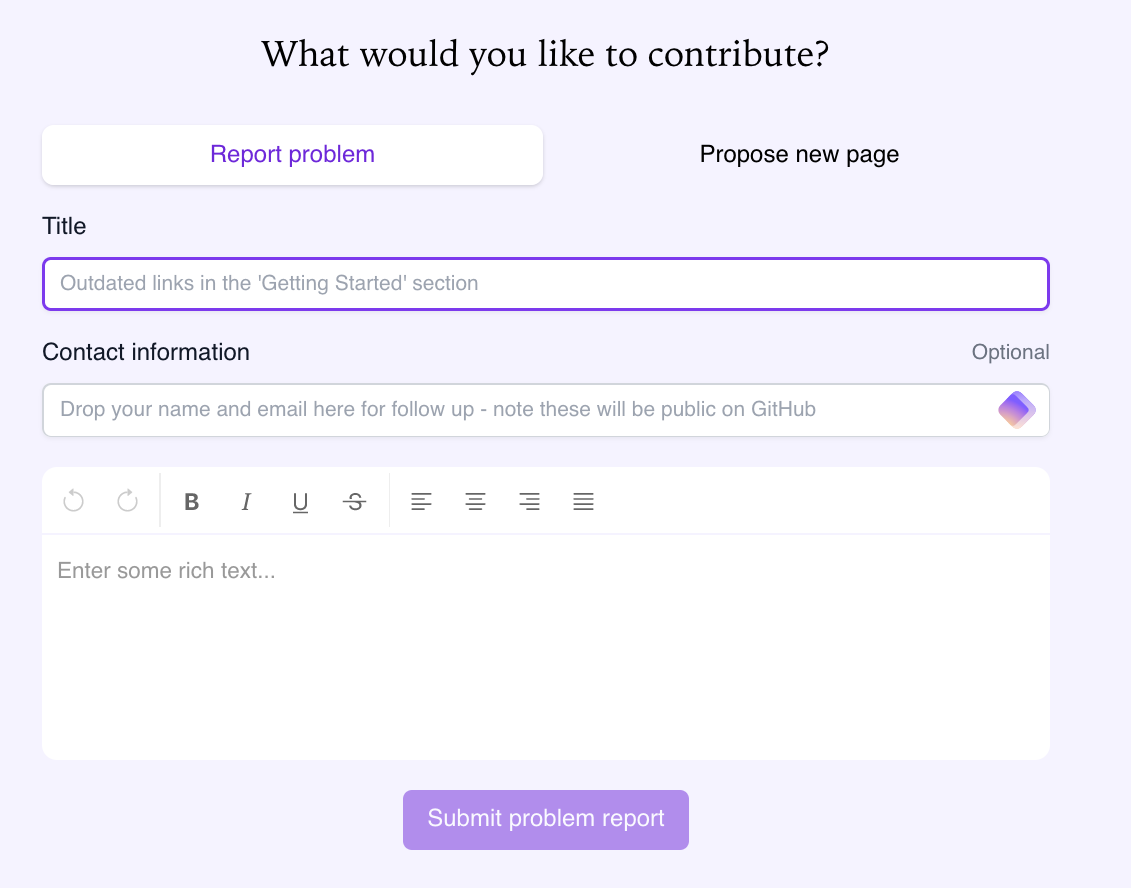
If you want to be credited with contributing, please share your name. If you’d like to hear back about what was done with your feedback or proposal, please also provide a direct way to contact you.
Contributing via GitHub
For the next steps you need a GitHub account to contribute. You can create one directly on GitHub.
Suggesting edits
The easiest and quickest way to contribute to the book is make suggested edits. On each page you will find a button reading “Edit this page” (usually on the right).
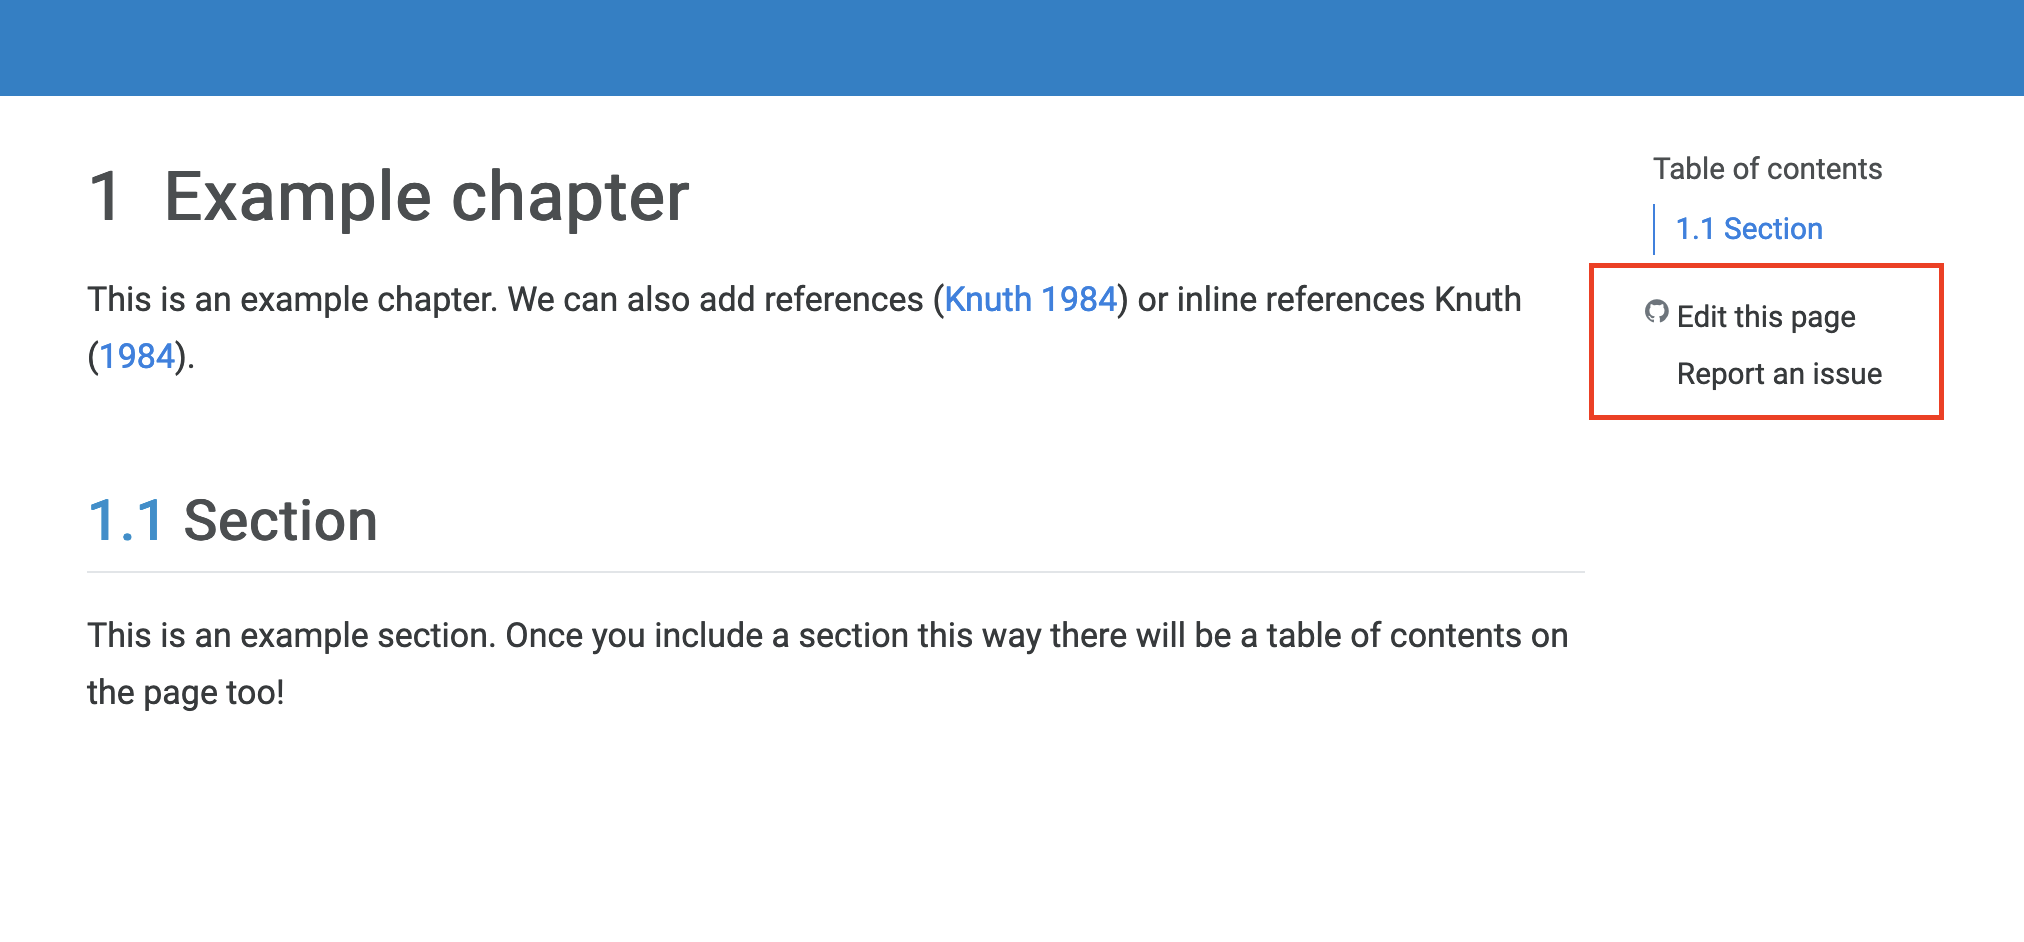
When you click that, you will immediately be taken to GitHub to edit the text of that specific page. You may be prompted to create a fork (forking) in case these are your first edits.

Once you made your edits, you are ready to commit (save) your changes and submit your pull request, requesting those changes to be included in the handbook.
Adding a topic
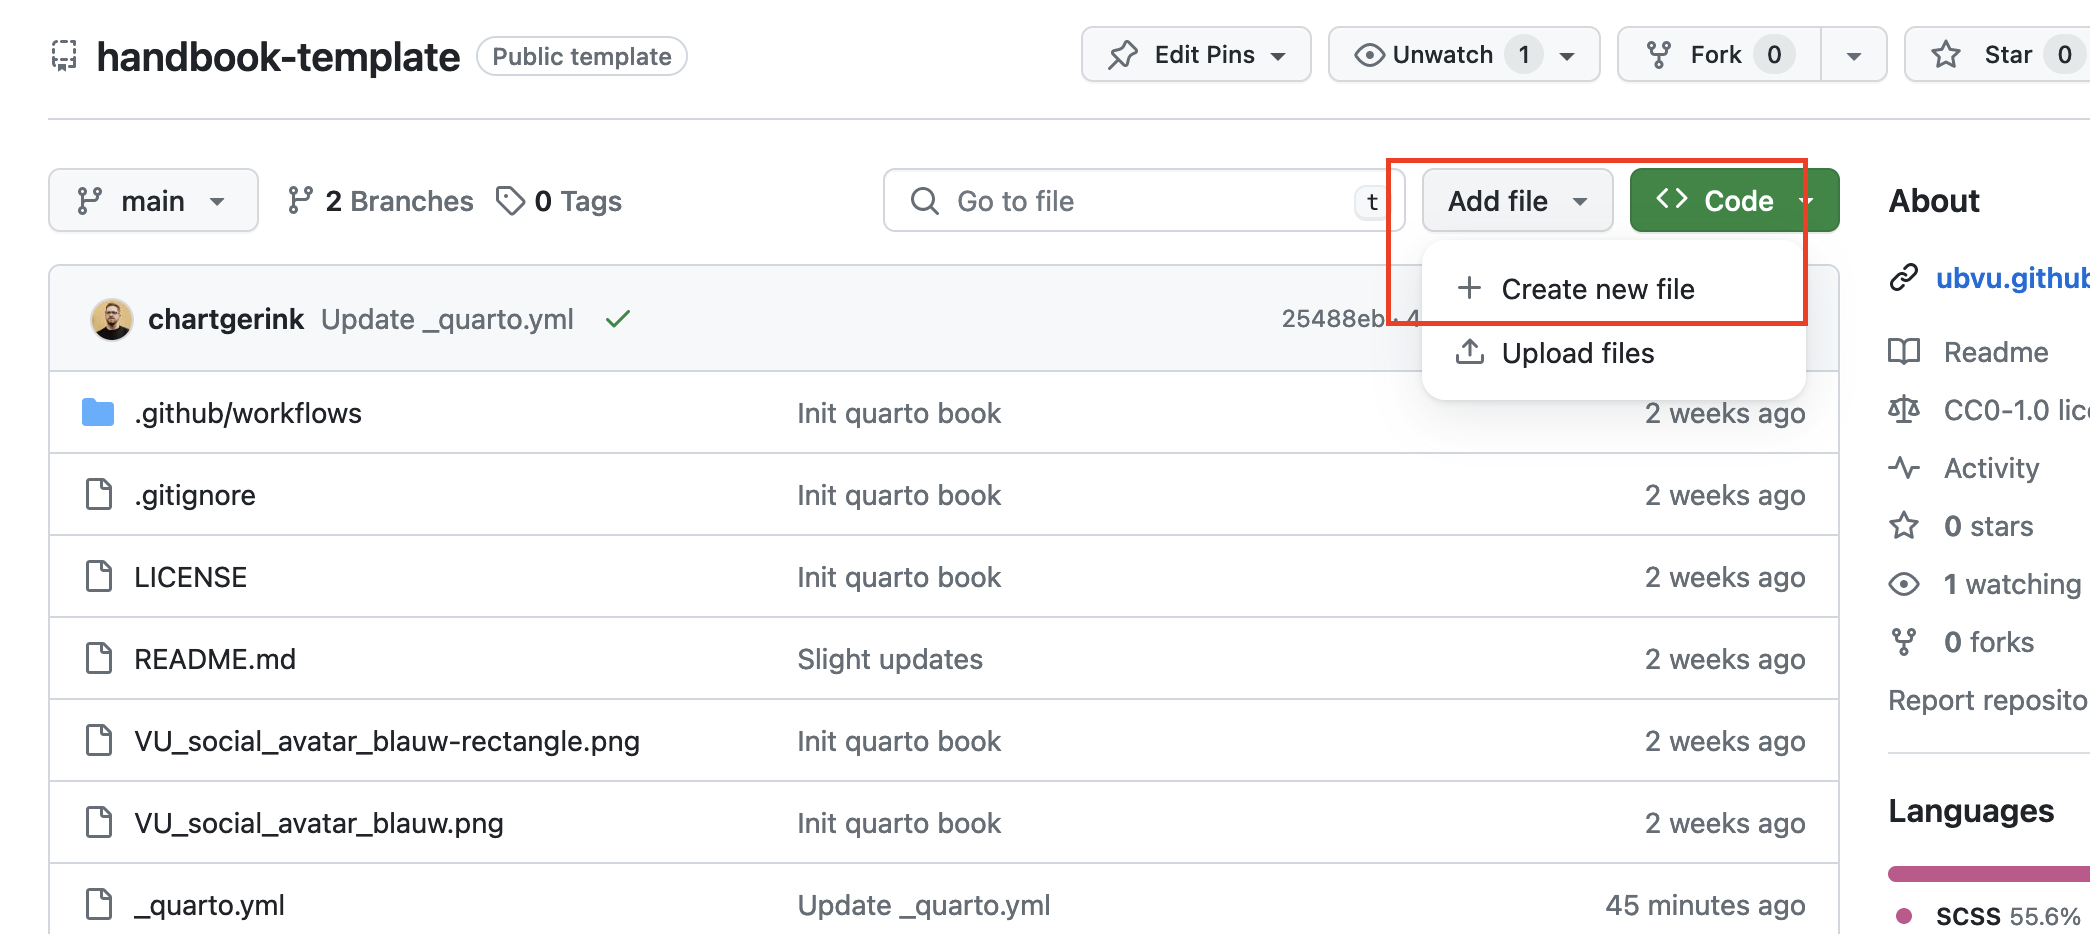
To add a new topic, you need to create a new file ending in .qmd in the topics folder (e.g., topics/example.qmd). You can do this by visiting the handbook page on GitHub and clicking Add file -> New file.
When you click this button you may be asked to fork the repository. This is not a problem so go ahead!
The topic itself needs to be written in Markdown. Every topic must be a noun/noun phrase and contain the title as such:
---
title: Example topic
---
Section headings are second level headings (e.g., ## Section). You can add all needed information as you want, but please mind that topics are supposed to short and self-contained for readers of the Research Support Handbook.
After that, you are ready to submit your pull request! The reviewers will help you place the topic in the right place of the book.
Adding a guide
To add a new guide, you need to create a new file ending in .qmd in the guides folder (e.g., guides/example.qmd). You can do this by visiting the handbook page on GitHub and clicking Add file -> New file.
When you click this button you may be asked to fork the repository. This is not a problem so go ahead!
Every guide title must reflect the question the guide answers. Add the title by adding the following information at the top of your document:
---
title: How do I create a guide?
---
Section headings are second level headings (e.g., ## Section). The guide itself needs to be written in Markdown.
You can re-use topics literally in your guides. For each topic you want to include, you can either mention so on a line surrounded by whitespaces:
INSERT TOPIC: DATA MANAGEMENT PLANThis will tell the editorial team to include that topic there. Please be specific in naming the topic. You can also directly include the topic yourself directly using the following code:
## Topic name

    ```{.include shift-heading-level-by=2}
    ../topics/replace-with-filename.qmd
    ```
You need to count the heading level in your guide to identify your shift number. In this case, there are two ## so we shift by two. You can verify the filename directly, but it should correspond to each word separated by a minus sign (for example, data-management-plan.qmd).
After that, you are ready to submit your pull request!
Submit a pull request
Once you have made suggested changes, a pull request is the way for you to ask for your changes to be incorporated into the Research Support Handbook. The handbook editors will review what you wrote, ask some questions, and accept or decline your contributions.
We recommend keeping your suggested changes small or limited in scope, and explaining why you are suggesting these changes. It is more likely your changes are included when you are fixing a typo or adding a paragraph, and less likely if you are revising the entire handbook. It is also more likely they are included if you explain why you are suggesting the changes, rather than dropping by and making edits without any context.
If you are adding a new topic or guide, it is definitely recommended to open an issue first to see whether there is a need for it (and maybe you’ll find collaborators!).
During the review process you may be asked to update your changes, or revisions may be added by the people maintaining the handbook. It is helpful if you keep an eye on your GitHub account to ensure timely responses to help the process along. By contributing, you become part of the process :blush:
Writing text
The book is created using Markdown - you can get familiarized with the basic syntax on the Markdown website. The getting started quick items are:
# Heading level 1
## Heading level 2
### Heading level 3

You simply write text as you are used to. To make something *italic*, **bold**, or ***bold and italic***.

> this is how you add quotes

- or lists
- that can go on
- and on
If you want to add code, use references, create links, or footnotes - it is all possible. We will expand examples here based on your needs, so if you need help, let us know by reporting an issue!
Adding relative links
Often, you will want to link to other pages or sections in the Research Support Handbook. Instead of going to the website, and pasting the link from there (for example, https://ubvu.github.io/open-handbook/contributing.html), you can add what is called “relative links.”
Relative links require three concepts:
- Working directory: The folder in which the file you are editing is located
./= indicates the current folder../= indicates the folder one level up
This Contributing guide is located in the “root” directory, and there is no upper folder. If we wanted to link to a topic, we would use ./topics/example-topic.qmd. This would create a relative link to the example file.
Relative links link to the .qmd files, never to the .html pages. These only exist when the pages are rendered!
If we were editing a topic, and we wanted to link out to a guide, we would need to use ../guides/example-guide.qmd. This because we would be in the topic folder for that file, and need to navigate one level up (../) and then down into the guides folder.
Section links
Whenever we link to a specific guide or topic, you can also link to a specific section. This helps you point readers to what you want them to read, and helps them find the information they need.
The easiest way to find these section links is to navigate to the relevant page, and click on the link icon next to the heading. This will cause your URL to change.
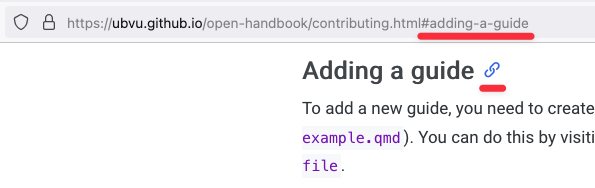
You add the #adding-a-guide (as applicable in your case) to the end of your relative link, and you will have created a relative section link! :blush:
If the section is on the same, you can drop the relative link altogether and keep only the part after the # (for example, #adding-a-guide).
Adding images
In markdown, you can easily add images and alt text at the same time. We require alt text on all images, and if you are contributing an image, you can best describe its value in the text.
You add images by using:
More information about GitHub
We use GitHub to create this website automatically, and to manage all the incoming updates. You do not need to know how it works entirely, but we want to help you understand some things so you are not confused.
Repository
A repository on GitHub is like a folder on your computer. This can be many things, depending on what files it contains.
When we mention a repository here, we mean that we want you to look at a specific folder. The repository for this website for example can be found on GitHub directly. You will always be contributing to a repository, in order to contribute to the handbook.
Forking
A repository is owned by one or multiple people on GitHub. If you are not one of them, you can create a copy of the repository (folder) to make your edits in. This act of creating a copy is called “forking.”
When you create a copy, you do not have to worry about accidentally removing or destroying the handbook. Your changes are not reflected in the website until you submit a pull request.
Adding references
If you want to include references throughout the handbook, we recommend you do so in the following way.
Add the BibTex
You can find the relevant BibTeX information using a tool like the DOI to BibTeX converter. Counterintuitively, it also works on ISBNs for example.
After you found the BibTeX information, you add it to the references.bib file (preferably all the way at the bottom). Example BibTeX information is:
@ARTICLE{example-code,
  title     = "Example Title",
  author    = "Author, Example"
  journal   = "Example Journal",
  year      =  2042,
  copyright = "https://creativecommons.org/licenses/by/4.0",
  language  = "en"
}
Add the citation
To add the citation to a page, you use [@example-code] or @example-code.
@example-code will result in an in-text citation, like “Author (2042).”
[@example-code] will result in a regular citation such as “(Author, 2042)”.
For more details on citations, see also the Quarto help page on citations.
Rendering handbook locally
Sometimes you may want to preview the changes you are making to the handbook. That is possible in most cases, but requires you to install some software. You need to install Quarto and assuming a successful installation, you then need to run the following code in your terminal:
# Clone the git repository
git repo clone https://github.com/ubvu/open-handbook
# Go into the right folder
cd open-handbook
# Render the handbook
quarto render .
We do not guarantee this will work immediately, but should cover most instances. If you are looking to contribute and want to render things locally, try this first, and if you run into any issues, let us know in an issue report. We’re happy to try our best if you share your error messages :blush: